Showing posts with label tutorial. Show all posts

Thursday, September 8, 2011

Frosted Mason Jar Luminaries


I'm obsessed. There, I admitted it. I'm still going crazy with mason jars! The latest idea just sort of came to me; why not frost a mason jar to use as a luminary? And, why not add personalization? So, here we have a Frosted Mason Jar Luminary, personalized! On the first jar I did, I only used a single letter for personalization. Then I had a custom order through my Etsy shop for a full monogram, which is pictured above. I think I love that even more than the single letter! I fell in love immediately.

If you want to do it yourself, it's super easy. All you need is a mason jar, or an old spaghetti sauce/pickle/canning/whateverkindofjar, Frosted Glass Spray Paint (found at your local hardware store or Walmart),a tea light candle or LED tea light, and a way to monogram/personalize. I used my Pazzles die cut machine to cut out vinyl lettering, but you could also use paint, or good old fashioned glue and construction paper. I also used flat black spray paint to paint the ring of the lid to make it all matchy-matchy.

I'll try to put up a full tutorial with pictures and everything very soon, but that list should get you started! Have fun!

The picture above has an LED tea light in it. I just love the glow, and it even flickers a bit like a real candle would. So cute!

----------------------------------------------------------------------------------------------------------

Like what you see? Never miss another post by subscribing to my blog via email! Also be sure to check out my other Tutorials. Enjoy!

--------------------------------------------------------------------------------------------------------------------------------

Linked up at:


Join  us Saturdays at tatertotsandjello.com for the weekend wrap 
 up           party!

Sunday, April 24, 2011

A Simple Skirt - Finally!


I've been meaning for a few weeks to make A Simple Skirt for my daughter, but I kept forgetting to buy the 1-inch elastic that the tutorial calls for. Well, this weekend my sister-in-law and her family were in town for Easter, and since she also loves to sew, she brought her sewing goodies with her.

Last night we had a little sewing circle that involved wine and various little projects, including a "2" shirt for my boy. His birthday was last Saturday, but I'm a little behind. He is going to be 2 for a whole year, afterall.
Anyway, last night while we were sewing we decided to use some of my mountains of fabric and make the girls (her daughter and mine - they're 3 months apart and the best of friends) matching skirts. Perfect, I thought. And she just happened to have the 1-inch elastic that we needed.


The simple skirts turned out to be just that - simple. I love projects that are fast and easy, with instructions that are easy to understand. I meant to take step-by-step photos of the skirt-making, but we were all just chit-chatting and having a great time, so I didn't do it. I do plan on making more of these skirts in the future, so I'll post photos next time I make one. In the meantime, hop on over to MADE and check out the tutorial for yourself.


Next time I'll make it a little shorter since it gets so hot in Atlanta over the summer, but I like it long, too!

Friday, April 15, 2011

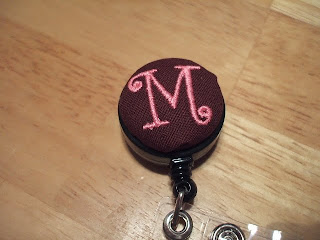
Covered Button Badge Reels - A Tutorial!

A few years ago when I first got my embroidery machine, I discovered personalized badge reels. Having to wear an id badge at work all the time, I thought this was a great idea, and I created a tutorial to share with others. Well, not so much share, as sell. And sell it did. But now I'm older and wiser, and in more of a giving spirit, so I decided to share the whole tutorial, with pictures, here for you! Hope you enjoy!
Materials:
~ ID Badge Reel
~ Size 45 Ready-to-Cover button (1 1/8 inches)
~ Button covering tool (available in starter pack with buttons at most fabric/craft stores – 2 pieces, usually 1 blue, 1 white)
~ Small Piece of fabric with embroidered initial (embroidery is optional)
~ E6000 Adhesive, or other really strong glue (be careful, this stuff is powerful!)
~ Pliers
Covering the button:
  • Embroider small initial or design onto fabric of choice. The size of the font/design should be 1” or less, ¾” is preferred

  • Centering initial/design on fabric, cut according to template on back of button package, referring to the size of your button. The fabric should be roughly twice the size of the button when cut

  • Again, making sure the design is centered, place fabric face down in button covering tool (mold)

  • With pliers, remove shank from button back

  • Place button face on top of the fabric in tool with rounded side down

  • Tuck fabric into back of button face, then place back on top

  • Press plunger (usually the blue piece) down on top of everything until you hear a pop

  • Pop button out of mold, and

  • Voila! You have a fabric covered button!

Attaching Covered Button to Badge Reel:

  • Make sure the shank (metal loopy piece) has been removed from back of button
  • At this point, some crafters like to fill the indentation on the back of the button. If you choose to do this and save a little glue, one option is to glue craft foam to the back of the button. Let that dry completely, then proceed with the following steps.

  • Glop some E6000 directly onto the badge reel/clip or the back of the button, spreading it around almost to edges of reel or button

  • Center, and gently place button on top of glue, smooshing out the extra glue to make sure the edges of the button are covered

  • Carefully wipe away excess glue, being sure not to dislodge button placement

  • Let sit for 24 hours to allow glue to fully dry

  • Enjoy your new supercute badge reel/clip, and be the envy of your coworkers!

Sources:
Retractable ID Badge Reels:
  • Online at eID Badges - lots of options available! Multiple color choices, as well as shapes and types of clips. I've used these myself, and they're perfect for this project.
  • Office Depot, in stores and online
  • Office Max, in stores and online
  • Staples, in stores and online
  • Wal-Mart, in store in the Office Supply area (not all Wal-Marts carry them)
  • Check Etsy.com as well

Buttons To Cover:

In Stores:
  • Hancock Fabrics Store
  • Joann Fabrics in stores
  • Michaels
  • Hobby Lobby
  • Your local sewing store
Online:
E6000:
  • Available at hardware stores as well as craft stores, in the glue section
  • For online availability and more information, check the manufacturer’s website.
  • NOTE: This is an industrial adhesive, so please follow directions and make sure to read the “Caution” section!


Small Embroidery Fonts:

There are lots of places to get small embroidery fonts, but my favorite is Jolsons Designs at http://www.jolsonsdesigns.com/. The font pictured on the badge reels in the tutorial is the “Tiny Curlz” from Jolsons. They always stitch out great, and fit perfectly. Another favorite is from Reen at http://www.embroiderygarden.com/. She has lots of wonderful designs available, and even a set of templates and fonts specifically for Covered Button projects. Be sure to check it out!
Be careful, making badge reels can become addictive!


Friday, April 8, 2011

Flashback Post: Placemat Purse Tutorial

I'm going to cheat today, and bring back a post that I did way back in 2008: My first ever tutorial! I hope you enjoy!

Ta Da! Welcome to Shannon's First-Ever Tutorial! I was browsing around sewforum.com today and saw a very nicely done version of a placemat purse that I had never seen before. The person who posted her pictures didn't post how she did it, so we (me and a few others on the board) decided that we could just figure it out. And we did! I was at work all day, so I started playing around with a piece of paper, and ended up with a very nice office paper purse, complete with staples. I'll have to post that picture, just because it's funny. Anyway, I have a ton of placemats lying around just waiting to be made into bags, so I got home and after putting my neanderthal/toddler to bed, I started to play with a real placemat. And this is what happened:

Alternative Placemat Purse Tutorial (better name is pending - I'm open to suggestion!) 1. Start with your standard placemat. This one is 13” x 19”.

2. Fold in half lengthwise.

3. Rotate

4. Fold bottom up until you have the desired size of your bag. Pin and sew all the way around (you don’t have to do the bottom unless you want a top-stitched look). Make sure you use a heavy duty needle or a walking foot, depending on the weight of your placemat. This one is heavily interfaced, so it was pretty thick at the corners.

5. After sewing, you’ll have two pockets on the inside. It’s magic! Feel free to attach any closure at this point; snaps, Velcro, ribbon, whatever. I didn’t attach a strap to this one as I didn’t have any cord on hand, but I would attach it here.

6. And, voila! The almost finished placemat wallet/purse. This is relatively small, so I envision it to be used as a wallet while traveling, shopping, clubbing, any time you don’t want a large clunky bag with you. Great for moms! I didn’t permanently attach the ribbon, since I’m not sure if I’ll stick with it or not. I may embroider it.

Variation: I didn’t add any depth to the bag, but here’s what you can do: 1. Flip bag inside out 2. Cut about a 1-inch notch out of each corner at the bottom of the bag (I hope you can visualize this..Word won't let me copy the cute little graphic I drew) 3. After cutting, smoosh corners together and sew across the smoosh on both corners. I’m sorry, but I don’t have a picture to illustrate this, and my drawing skills are limited. If you have any questions please ask! 4. Flip bag right side out, and now you have a little depth to your bag!

There you have it! If you have any questions, please don't hesitate to ask, and I'll do my best to help you. Special thanks to tzb123 on sewforum for my "A ha!" moment! I'll be sure to post pictures of the bag when I do get it completed with strap and embellishment. This should give you the basic idea, though! Go on! Be creative!


4/8/11 - As of this repost, this purse is STILL sitting in a box without a strap. I think it has pins in it, too. Don't tell anyone...

Wednesday, April 6, 2011

New Project: A Simple Skirt

-image from Dana at dana-made-it.com

I decided that while I'm doing the Ultimate Blog Challenge, I'll do another sewing project. Before I participated in the Sew Along for Japan, I hadn't actually sewed anything for a while. I finished a few projects on my embroidery machine here and there, but I hadn't actually sewn anything in...well, a while. Oh wait, I did sew a couple of key fobs, but those take about 2 seconds, so I don't feel like they really count.

I actually forgot how much I enjoyed sewing, so I started looking around for another project I could work on and blog about. I've been doing more craft blog hopping lately, and have been finding some wonderful blogs that offer a great deal of inspiration as well as tutorials. My first new favorite is Living with Punks, as I've mentioned before; this is where I participated in the Sew Along for Japan, and rediscovered my love of sewing. Just yesterday I was browsing around the interwebs and stumbled across Made. I don't even remember how I found it; I believe it was because a Facebook friend had "pinned" this particular tutorial and it struck my interest.

So, my next project is to make "A Simple Skirt" from Made for my Pookie. I figure with a tutorial this easy, I should be able to do it without a problem. Maybe I'll make her two. Or maybe I'll make one for myself. Maybe, just maybe, I'll even make matching skirts for my nieces. But then, both sisters-in-law also sew, so maybe they'll just make skirts for their own girls. ;)

I dug through my fabric stash this evening looking for some purple polka dot fabric (Michael Miller, I believe) that I know I have around here somewhere, but couldn't find. I unearthed this purple fabric from Joann's instead, so I'm going to go with it: Again, I apologize for my terrible pictures. Someday soon I'll get it together and take non-cellphone photos in actual daylight.

This fabric is perfect for a summer skirt. It's hard to tell in the pic, but it's a nice laverder-y purple color with hearts and swirls throughout. Supercute for a 4-year old!

I still need to wash the fabric, round up some elastic, and take measurements, but I'll get that taken care of and get started. Stay tuned for the finished product (or products!). Maybe I'll even (gasp!) use bias tape. We'll see how it goes.

Oh, and go check out what all Dana has to offer on her blog. There are tons of tutorials, patterns, recipes, and other great stuff!

Wednesday, June 18, 2008

Badge Reels, and More Badge Reels

I'm having fun with these, and they seem to be popular! I haven't even put them (aside from the PBR one) in the shop yet because I'm waiting on a large order of blanks. Here are a few I've done recently:

The bottle cap idea came while I was trying to figure out what to do with the TON of beer bottle caps my husband has saved for the past...oh I don't know, at least 5 years. I was working on embroidered badge reels at the time, and kind of had a lightbulb pop up over my head. So, I don't know if there will be much interest, but I think it's fun! It's currently listed in my alter-ego Etsy shop, MooreCrafty. Look for magnets to be making an appearance very soon!


Well we just have to have a UGA badge reel, right? This was a request not only from my friend Sara, but from another coworker as well.

This was a special order from yet another coworker. These girls are loving these things! And I love them. :-)

I know the badge reels don't really fit into the Babies and Kids theme of Sugar Plum Delights, but we're here for mommies and daddies, too. Plus I think they're a lot of fun!

I also had a special order for "Future (insert occupation) " bibs, and I really liked the way they turned out! These will be making an appearance in the shop very soon, just in case anyone else needs them!

So, these things should keep you happy for now. But just know that there are many many more fun things coming soon! I'm just waiting for some shipments to come in...and I can't wait!

Oh wait! I can't believe I almost forgot to mention this! Are you interested in making Embroidered Badge Reels on your own! I've recently published a How-To! "Make Your Own Embroidered Badge Reels", the tutorial, is now available in the shop! The instructions are very simple, there are lots of pictures, and even a source list! And it's cheap! I'll be putting together a "Starter Kit" to go with the tutorial very soon!

Tuesday, March 18, 2008

She's Crafty...

Ta Da! Welcome to Shannon's First-Ever Tutorial! I was browsing around sewforum.com today and saw a very nicely done version of a placemat purse that I had never seen before. The person who posted her pictures didn't post how she did it, so we (me and a few others on the board) decided that we could just figure it out. And we did! I was at work all day, so I started playing around with a piece of paper, and ended up with a very nice office paper purse, complete with staples. I'll have to post that picture, just because it's funny. Anyway, I have a ton of placemats lying around just waiting to be made into bags, so I got home and after putting my neanderthal/toddler to bed, I started to play with a real placemat. And this is what happened:


Alternative Placemat Purse Tutorial
(better name is pending - I'm open to suggestion!)


1. Start with your standard placemat. This one is 13” x 19”.


2. Fold in half lengthwise.


3. Rotate


4. Fold bottom up until you have the desired size of your bag. Pin and sew all the way around (you don’t have to do the bottom unless you want a top-stitched look). Make sure you use a heavy duty needle or a walking foot, depending on the weight of your placemat. This one is heavily interfaced, so it was pretty thick at the corners.


5. After sewing, you’ll have two pockets on the inside. It’s magic! Feel free to attach any closure at this point; snaps, Velcro, ribbon, whatever. I didn’t attach a strap to this one as I didn’t have any cord on hand, but I would attach it here.


6. And, voila! The almost finished placemat wallet/purse. This is relatively small, so I envision it to be used as a wallet while traveling, shopping, clubbing, any time you don’t want a large clunky bag with you. Great for moms! I didn’t permanently attach the ribbon, since I’m not sure if I’ll stick with it or not. I may embroider it.

Variation: I didn’t add any depth to the bag, but here’s what you can do:
1. Flip bag inside out
2. Cut about a 1-inch notch out of each corner at the bottom of the bag (I hope you can visualize this..Word won't let me copy the cute little graphic I drew)
3. After cutting, smoosh corners together and sew across the smoosh on both corners. I’m sorry, but I don’t have a picture to illustrate this, and my drawing skills are limited. If you have any questions please ask!
4. Flip bag right side out, and now you have a little depth to your bag!

There you have it! If you have any questions, please don't hesitate to ask, and I'll do my best to help you. Special thanks to tzb123 on sewforum for my "A ha!" moment! I'll be sure to post pictures of the bag when I do get it completed with strap and embellishment. This should give you the basic idea, though! Go on! Be creative!