
 A few years ago when I first got my embroidery machine, I discovered personalized badge reels. Having to wear an id badge at work all the time, I thought this was a great idea, and I created a tutorial to share with others. Well, not so much share, as sell. And sell it did. But now I'm older and wiser, and in more of a giving spirit, so I decided to share the whole tutorial, with pictures, here for you! Hope you enjoy!
Materials:
~ ID Badge Reel
~ Size 45 Ready-to-Cover button (1 1/8 inches)
~ Button covering tool (available in starter pack with buttons at most fabric/craft stores – 2 pieces, usually 1 blue, 1 white)
~ Small Piece of fabric with embroidered initial (embroidery is optional)
~ E6000 Adhesive, or other really strong glue (be careful, this stuff is powerful!)
~ Pliers
Covering the button:
- Embroider small initial or design onto fabric of choice. The size of the font/design should be 1” or less, ¾” is preferred
- Centering initial/design on fabric, cut according to template on back of button package, referring to the size of your button. The fabric should be roughly twice the size of the button when cut

- Again, making sure the design is centered, place fabric face down in button covering tool (mold)
- With pliers, remove shank from button back
- Place button face on top of the fabric in tool with rounded side down

- Tuck fabric into back of button face, then place back on top
- Press plunger (usually the blue piece) down on top of everything until you hear a pop

- Pop button out of mold, and
- Voila! You have a fabric covered button!

Attaching Covered Button to Badge Reel:
- Make sure the shank (metal loopy piece) has been removed from back of button
- At this point, some crafters like to fill the indentation on the back of the button. If you choose to do this and save a little glue, one option is to glue craft foam to the back of the button. Let that dry completely, then proceed with the following steps.
- Glop some E6000 directly onto the badge reel/clip or the back of the button, spreading it around almost to edges of reel or button

- Center, and gently place button on top of glue, smooshing out the extra glue to make sure the edges of the button are covered
- Carefully wipe away excess glue, being sure not to dislodge button placement
- Let sit for 24 hours to allow glue to fully dry
- Enjoy your new supercute badge reel/clip, and be the envy of your coworkers!

Sources:
Retractable ID Badge Reels:
- Online at eID Badges - lots of options available! Multiple color choices, as well as shapes and types of clips. I've used these myself, and they're perfect for this project.
- Office Depot, in stores and online
- Office Max, in stores and online
- Staples, in stores and online
- Wal-Mart, in store in the Office Supply area (not all Wal-Marts carry them)
- Check Etsy.com as well
Buttons To Cover:
In Stores:
- Hancock Fabrics Store
- Joann Fabrics in stores
- Michaels
- Hobby Lobby
- Your local sewing store
- http://www.joann.com/
- http://www.jcarolinecreative.com/
- http://www.craftersvision.com/
- http://www.hancockfabrics.com/
- Your favorite online craft/sewing supply site
- Available at hardware stores as well as craft stores, in the glue section
- For online availability and more information, check the manufacturer’s website.
- NOTE: This is an industrial adhesive, so please follow directions and make sure to read the “Caution” section!
Small Embroidery Fonts:
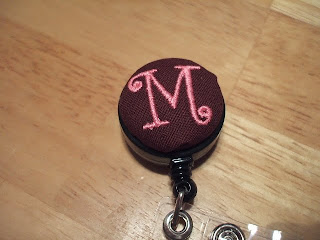
There are lots of places to get small embroidery fonts, but my favorite is Jolsons Designs at http://www.jolsonsdesigns.com/. The font pictured on the badge reels in the tutorial is the “Tiny Curlz” from Jolsons. They always stitch out great, and fit perfectly. Another favorite is from Reen at http://www.embroiderygarden.com/. She has lots of wonderful designs available, and even a set of templates and fonts specifically for Covered Button projects. Be sure to check it out!
Be careful, making badge reels can become addictive!
No comments:
Post a Comment