Wednesday, April 27, 2011

Crafting Update - The Redneck Wine Glass and More

I've finally gotten around to updating my Etsy shop with a few things I've been working on.


First up, the Redneck Wine Glass! I first saw these on a message board/forum that I frequent, and thought they were hilarious. I apologize, but I didn't keep track of where the original idea came from, so if you're out there, great job!


These glasses are so much fun! Imagine sitting on that couch in your yard with your friends drinking your favorite refreshing beverages with this fancy stemware. You'd be the talk of your neighborhood! Personalization of your choice is included in the price. This one was made for my brother-in-law Brian, who wanted one as soon as he saw it.


Another new addition to the shop is a few more designs of the checkbook covers that I just love.

These are so much better than those boring bank-issued covers, and just as sturdy. Matching card holders are available, too!

That's about it for now. I've also been working on I Spy Bags, but haven't gotten any pictures yet. I'll be writing up a tutorial on those soon! Your kids will love them.

Now I must go and snack on some more peanut butter balls to maintain my sugar levels at super-high. :)

Tuesday, April 26, 2011

The Ultimate Blog Challenge - Progress


As you may remember from a previous post, I joined the Ultimate Blog Challenge for the month of April. The idea was to write 30 posts in 30 days in order to gain more readers, and also to make it habit to blog regularly. Well, here it is, Day 26, and I'm behind. My original goal was to complete the challenge, obviously, and I still might by bombarding my readers with posts, but I feel like I've still accomplished something great by doing this Challenge. It got me to think. I've been thinking a lot about my blog; how I can improve it, how I can make it look better, how I can draw in more readers, and keep them coming back for more. It has also gotten me to write more, which is something I've been wanting to do for a long time, but for whatever reason, I just would never sit down and do it.


I essentially have 4 more days to write 9 more posts, for a total of 30. Can I do it? I'd like to think I can. Will I continue to blog regularly after April 30? You betcha. I've really enjoyed sharing what I've been up to, and my creative juices are flowing! I want to craft more, I want to bake and cook more, and I want to share it all and hopefully inspire one or two people along the way.


What would you like to see? I love feedback, please share! And thanks for reading. :)

Get Rewarded with Swagbucks! It Works!


Are you using Swagbucks yet? If you do a lot of internet searches using Google or Bing, you could be earning Swagbucks just for using the Swagbucks search engine, and you'd get the same results. Your search results will actually be pulled from Google, AND you'd be earning points, or bucks, so it's a win-win!


How does it work? Like I said above, you would do your internet searching just as you would with any other search engine, only you would randomly be awarded points, or bucks, that you can later redeem for great prizes. I use the Swagbucks Toolbar so it's super-easy for me to search for anything and everything. Even if I'm going to a page that I use regularly, and know the address, I'll just type it into the search box for another chance to earn Bucks. The more you use it, the more you'll earn!


What can I get? There are tons of awards to choose from in the Swag Store. My favorite is the Amazon gift cards. Anything I'm looking for is generally available on Amazon, so that's what I go with. There are also gift cards available for Starbucks, Target, Restaurant.com, Travelocity, and so many more. You could even get cash through PayPal. There are prizes other than gift cards, too, such as a Digital Rice Cooker and Food Steamer, or a Wii. Lots of options!


How can I earn more? You can earn plenty of Bucks just using the search option, but there are other ways to earn as well. Random Swag Codes are put out during the day, and they can be entered into the Code box on the main Swagbucks page. You can check their blog, Twitter and Facebook page to see when a code may be available. You can also earn Bucks through Referrals; just refer your friends, write a post like this one on your blog, Tweet about it, or post on Facebook. Let others know that you're getting free stuff, and they'll sign up too!


Does it really work? YES! I've earned over $100 in gift cards since I first started using Swagbucks last year. You can too!


Go here to sign up and start earning.


Note: If you signup for Swagbucks through the links provided in this post, I will get referral credits. I hope this doesn't sway your decision! :)

Sunday, April 24, 2011

Chocolate Covered Peanut Butter Balls - A Love Story

When I went home earlier this month to visit my parents, I rediscovered something from my childhood that I absolutely loved: homemade chocolate-covered peanut butter eggs. One bite, and I was in heaven. It took me back to the days when I didn't have a care in the world.

When I got home to Atlanta, I decided that I would make these delightful eggs for myself, and thus began the quest for the perfect Peanut Butter egg recipe. Little did I know that my own dear grandmother (may she rest in peace) used to make these eggs for her kids - for some reason she never made them for my generation, her grandchildren, but I'll let that one slide. So, a special thank you to my Aunt Cindy for sharing Grandma's recipe with me. I'll be sure to pass it on!

If you want to make these for yourself, here's what you need:


  • 2 pounds of powdered sugar (10x)

  • 1 cup peanut butter - I prefer Jif, but use your favorite brand

  • 2 cups marshmallow creme

  • 1/4 pound margarine (1 stick)

  • a smidge of milk, if the mixture gets too dry - I had to use a little bit because the dough, or batter, was getting too hard to mix together

  • chocolate to melt for dipping - I used milk chocolate chips, but you can use semi-sweet or dark. Whatever you prefer.


Mix ingredients together, kind of like pie crust. I ended up having to use my hands because it really was doughy, and I had to knead it in order to get it all mixed together. I think next time I'll try my stand mixer and let it do the dirty work. If it just gets too thick to mix together, that's where the milk comes in. Just add a little at a time until everything is mixed together nicely.

Instead of shaping the dough/batter/mixture into egg shapes, I just rolled them into balls. After all that kneading, I was ready for something quick and easy, so rolling the balls fit the bill. At this point it's best to put the rolled balls in the fridge to set for at least an hour. Try to hold out, it's worth it! Some recommend letting them sit over night in the fridge, but I just can't wait that long.


Once everything is nice and firm, it's time to dip them in chocolate! I used my handy dandy little Wilton Chocolate Pro to melt the milk chocolate chips. Of course you can also melt the chocolate in the microwave or crockpot. I think a crockpot would be nice and easy, since it will keep the chocolate melted until you're finished.


Use a skewer or a fork to stab each ball and roll it in the melted chocolate, making sure it's covered entirely.


Plop the chocolate covered goodies onto wax paper to set, cover the holes with more chocolate, and you're finished!


I could barely stand to let them set as long as they needed to, so I put the first batch in the fridge until the chocolate wasn't so gooey. The second batch I'm just letting sit out overnight to see how that works.


When the chocolate is set, grab one and dig in!


So yummy - enjoy!


The next time I make them, I'm going to add a little more peanut butter, just because I love peanut butter. I'm a Reese's Peanut Butter Egg addict, but I really think these give the Reese's eggs a real run for the money!


Shared At:


A Simple Skirt - Finally!


I've been meaning for a few weeks to make A Simple Skirt for my daughter, but I kept forgetting to buy the 1-inch elastic that the tutorial calls for. Well, this weekend my sister-in-law and her family were in town for Easter, and since she also loves to sew, she brought her sewing goodies with her.

Last night we had a little sewing circle that involved wine and various little projects, including a "2" shirt for my boy. His birthday was last Saturday, but I'm a little behind. He is going to be 2 for a whole year, afterall.
Anyway, last night while we were sewing we decided to use some of my mountains of fabric and make the girls (her daughter and mine - they're 3 months apart and the best of friends) matching skirts. Perfect, I thought. And she just happened to have the 1-inch elastic that we needed.


The simple skirts turned out to be just that - simple. I love projects that are fast and easy, with instructions that are easy to understand. I meant to take step-by-step photos of the skirt-making, but we were all just chit-chatting and having a great time, so I didn't do it. I do plan on making more of these skirts in the future, so I'll post photos next time I make one. In the meantime, hop on over to MADE and check out the tutorial for yourself.


Next time I'll make it a little shorter since it gets so hot in Atlanta over the summer, but I like it long, too!

Saturday, April 23, 2011

Oreo Stuffed Brownies - A Recipe

I was bloghopping the other day when I stumbled upon this sinfully delicious-looking recipe over at Moms of all Trades: Oreo Stuffed Brownies. Brownies? Oreos? Marshmallow Creme? I'm all over it. And boy-oh-boy, I did not regret trying this out one little bit. Do you want to try it?

Here's what you need:


  • Brownie Mix - any brand/variety will do

  • Oreo cookies, or other chocolate and cream-type cookie - I used the store brand because I didn't have a coupon for regular Oreos (I'm thrifty that way). They taste just as good as the real thing for this project. Next time I'm going to try the Mint Oreos for that extra little kick

  • Marshmallow Creme - usually found in the baking aisle, or maybe even close to the peanut butter

Step 1: Spray muffin tins with Pam, making sure to cover completely


Step 2: Mix brownies according to package directions. Add 1/2 cup marshmallow creme, mix well.


Step 3: Open up your cookies. Try not to eat them all...


Step 4: One cookie at a time, dip into brownie batter, making sure cookie is completely covered.


Step 5: Place in muffin tin. I also scooped a little extra batter on top of the dipped cookie, just to make sure there was enough.


Step 6: Bake according to package directions. Mine got a little charred around the edges, but I didn't mind. I like the crispy brownies.


Step 7: Let cool, them pop them out of the muffin tins. From the outside you can't even tell there's a supersweet surprise inside...


Once they've cooled just a little bit, take a bite, and enjoy!

You're welcome. :)


Just think of all the wonderful goodies that could be stuffed into brownies!

Tuesday, April 19, 2011

Craft Envy and the Working Mom

Confession: I have serious craft envy. I have a day job where I have spare time throughout most days; this spare time is generally spent hopping around to different crafty blogs to see what others are creating out there. I see so much creativity and think: these are moms, like me, but they don't have a day job. This makes me envious. Then I think, well, if I didn't have to work, I could get so much done! I could work on all of the projects that I see and want to try for myself, but just don't have the time! Sewing, baking, Cricut crafting, fun with mod podge...oh yeah, and spending more time with the kidlets fits in there somewhere, too.

I realize that the grass is always greener on the other side, and I have no idea what daily life is like for these other craft mavens. Maybe they're envious of someone like me for getting to come in to an office full of adults having adult conversations everyday (it's not all it's cracked up to be, let me tell ya). Not likely, but you never know.

For now, I do have to work, so I have to make do with late-night craft sessions and cramming too much into weekends. I have to remind myself to be thankful for what I have: a job that supports my family, two beautiful healthy children, and a husband who puts up with me jumping from project to project without rolling his eyes too much.

Maybe I'll just stop sleeping so I can finish everything I want to do!

Monday, April 18, 2011

Mother's Day Gift Ideas - A Guide

Mother's Day is rapidly approaching; in fact, I just realized today that it's only 2 weeks away! So, since I'm a consistent procrastinator, I decided to help out others who might be in the same boat by providing a quick list of great Mother's Day gift ideas. Mother's Day is May 8th, so if you're looking for something customized, you better get your orders in asap! Off we go...

Help mom keep up with her correspondence with the In Touch Clutch (tm) from DownstairsDesigns. This handy-dandy little clutch is super-versatile, and cute to boot! $28 for this great gift.

This is something that's on my own list, the Dainty Drops Necklace from The Vintage Pearl. It's sweet, simple, and holds your children close to your heart. And it's reasonably priced at $32.00 for one charm, or two charms for $45.00. Love it!


Another goody that I've been eyeballing for a while, a Perpetual Wooden Block Calendar from QueenVannaCreations. This one is "Country Kitchen Icons", but there are many others to choose from, and each only $19.00! There are lots of other fun items in her Etsy shop, so make sure you take a look at everything.
If your momma loves iced beverages like I do, especially iced mochas from a certain popular coffee franchise, then this is perfect! A Personalized Acrylic Double Walled Tumbler, with a straw, from little ol' me (my Etsy shop). She can use this cup over and over again and save a few disposable plastic cups in the process. I can do any font you choose, and currently have the following vinyl (for the personalization) colors available: pink (as shown), red, black, white, purple, ocean blue, brown, and kelly green. Only $12.00!


I love this Granny Square Messenger Bag from Happy2Knit! It reminds me of snuggling under my grandmother's afghans when I was little. This hand-crocheted bag is just the right size to carry everything you need, for $45.00. There are other fun goodies in this shop as well, like a crochet cupcake keychain!

Every mom deserves to be pampered, and what better way than a nice, all-natural, sugar scrub? This Saucy Scrub Sampler 4 Pack from Saucy Somethins is a great way to refresh mom's tired skin. For only $22.95, you get 4 4-ounce jars that are great for travel or the gym.

That about wraps up this edition. You may have noticed that these gift ideas came from Etsy - I can't promote handmade gifts enough! Support small businesses, crafters, and moms just trying to make a little extra money by shopping on Etsy. If you're looking for something unique for yourself or for a gift, there's no better place!

Sunday, April 17, 2011

Birthday Bubbles!

As I was poking around Target yesterday searching for the perfect birthday gift for my 2-year old, I discovered this Bubble Generator. Now, having a 4-year old and a 2-year old, we go through a lot of bubbles. I've run out of breath countless times trying to keep them happy by blowing bubbles. If you have kids, you know one thing: kids love bubbles. Lots of them. It doesn't matter if you're tired, if you're blue in the face, or if you're about to pass out, they want more.


I was originally leaning towards the bubble blowing lawnmower, but then I saw the Bubble Generator, and was intrigued. Once I saw the "Sale!" tag, I was sold. It was $10! That seemed like a deal to me, so into my cart it went.


After naptime, we were all outside enjoying the beautiful day, playing "Moo Ball" (basketball with a cow ball that says Moo on it), when I decided to bring out the bubble machine.


O.M.G. BOTH of the kids, and their daddy, went crazy. It took longer to get out of the packaging than it did to get it set up. It came with batteries (6 AA) and bubble solution (4 ounces - have more on hand), so it was ready to go right out of the box. And believe me, that's a good thing; I don't think anyone could have waited for me to round up the materials for this thing.


I turned this sucker on and was immediately blown away. The bubbles! They were everywhere! I think the 2-year old's jaw literally hit the ground. Bubble dancing commenced.


I was able to sit back and watch, instead of turning blue trying to keep the bubbles going. It was a hit, no doubt about it.

If you want to be wowed, you could check out the Amazing Bubble Generator on Amazon, or just go to Target, where it's considerably cheaper, even when not on sale.

Saturday, April 16, 2011

Happy Birthday, Little Man!

My boy turned two today. It's hard to believe that this little guy was so tiny, not so long ago. It seemed like he would never grow into those jammies!
And here he is, two years later; getting taller by the day, learning from everything he sees, and also learning how to be a little charmer. You have to watch out for those sparkling blue eyes.


He's mischievous, sweet, daring, cuddly, happy, charming, and a bundle of energy all rolled into one adorable little person.


And I wouldn't have him any other way. Happy Birthday to my little guy - never change.

Friday, April 15, 2011

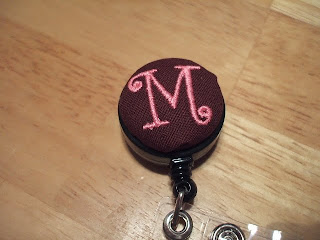
Covered Button Badge Reels - A Tutorial!

A few years ago when I first got my embroidery machine, I discovered personalized badge reels. Having to wear an id badge at work all the time, I thought this was a great idea, and I created a tutorial to share with others. Well, not so much share, as sell. And sell it did. But now I'm older and wiser, and in more of a giving spirit, so I decided to share the whole tutorial, with pictures, here for you! Hope you enjoy!
Materials:
~ ID Badge Reel
~ Size 45 Ready-to-Cover button (1 1/8 inches)
~ Button covering tool (available in starter pack with buttons at most fabric/craft stores – 2 pieces, usually 1 blue, 1 white)
~ Small Piece of fabric with embroidered initial (embroidery is optional)
~ E6000 Adhesive, or other really strong glue (be careful, this stuff is powerful!)
~ Pliers
Covering the button:
  • Embroider small initial or design onto fabric of choice. The size of the font/design should be 1” or less, ¾” is preferred

  • Centering initial/design on fabric, cut according to template on back of button package, referring to the size of your button. The fabric should be roughly twice the size of the button when cut

  • Again, making sure the design is centered, place fabric face down in button covering tool (mold)

  • With pliers, remove shank from button back

  • Place button face on top of the fabric in tool with rounded side down

  • Tuck fabric into back of button face, then place back on top

  • Press plunger (usually the blue piece) down on top of everything until you hear a pop

  • Pop button out of mold, and

  • Voila! You have a fabric covered button!

Attaching Covered Button to Badge Reel:

  • Make sure the shank (metal loopy piece) has been removed from back of button
  • At this point, some crafters like to fill the indentation on the back of the button. If you choose to do this and save a little glue, one option is to glue craft foam to the back of the button. Let that dry completely, then proceed with the following steps.

  • Glop some E6000 directly onto the badge reel/clip or the back of the button, spreading it around almost to edges of reel or button

  • Center, and gently place button on top of glue, smooshing out the extra glue to make sure the edges of the button are covered

  • Carefully wipe away excess glue, being sure not to dislodge button placement

  • Let sit for 24 hours to allow glue to fully dry

  • Enjoy your new supercute badge reel/clip, and be the envy of your coworkers!

Sources:
Retractable ID Badge Reels:
  • Online at eID Badges - lots of options available! Multiple color choices, as well as shapes and types of clips. I've used these myself, and they're perfect for this project.
  • Office Depot, in stores and online
  • Office Max, in stores and online
  • Staples, in stores and online
  • Wal-Mart, in store in the Office Supply area (not all Wal-Marts carry them)
  • Check Etsy.com as well

Buttons To Cover:

In Stores:
  • Hancock Fabrics Store
  • Joann Fabrics in stores
  • Michaels
  • Hobby Lobby
  • Your local sewing store
Online:
E6000:
  • Available at hardware stores as well as craft stores, in the glue section
  • For online availability and more information, check the manufacturer’s website.
  • NOTE: This is an industrial adhesive, so please follow directions and make sure to read the “Caution” section!


Small Embroidery Fonts:

There are lots of places to get small embroidery fonts, but my favorite is Jolsons Designs at http://www.jolsonsdesigns.com/. The font pictured on the badge reels in the tutorial is the “Tiny Curlz” from Jolsons. They always stitch out great, and fit perfectly. Another favorite is from Reen at http://www.embroiderygarden.com/. She has lots of wonderful designs available, and even a set of templates and fonts specifically for Covered Button projects. Be sure to check it out!
Be careful, making badge reels can become addictive!